该文章适用与商场上大部分主流的随身wifi(棒子)设备,如UFI001,UFI003,UFI103S(目前我手上只整过这几种)等 ### 准备 准备一下我们的各种工具(文章使用的工具下方均提供下载) 1. ssh连接工具(这里用xshell) 2. 安装好备份工具(这里用9008Tool工具) 3. 随身wifi助手(水遍工具箱)来自酷安作者:酷安水遍[更新助手官方版下载丨最新版下载丨绿色版下载丨APP下载-123云盘 (123pan.com)](https://www.123pan.com/s/8y49-oBZ0h)安装时候选择**驱动程序全部安装** 4. Debian系统底包: 可以选择以下大佬的低包使用: 1. [来自 快乐的我531 - 酷安 (coolapk.com)](https://www.coolapk.com/feed/37616461?shareKey=YTNkNDNkZjk0NGIwNjJmMjY0ZjY~) 2. 超频底包:[410随身wifi 各个频率版&释放内存版&驱动全面 来自 jsbsbxjxh66 - 酷安 (coolapk.com)](https://www.coolapk.com/feed/41664623?shareKey=M2E4YmM5MmE4N2Q1NjQzNjhiZjk~&shareFrom=com.coolapk.market_13.1.1) [button color="info" icon="" url="" type=""]转存的文件[/button][tabs] [tab name="123盘" active="true"]https://www.123pan.com/s/o14eVv-6y5Sh.html提取码:nnya[/tab] [tab name="阿里云"]无[/tab] [tab name="本地"]无[/tab] [/tabs] ### 开始 #### 随身WiFi助手安装驱动 将上面的随身wifi助手安装到电脑上,然后把wifi棒子插到电脑上,打开助手给你先鸡太美一段,不是毒瘤哦!!! 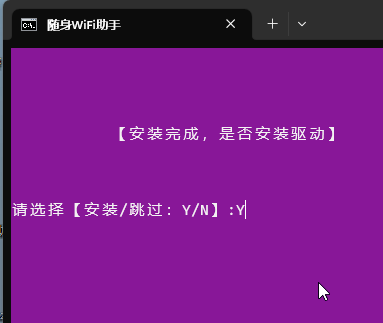 回车后会有驱动弹窗,点两下装就可以了  安装 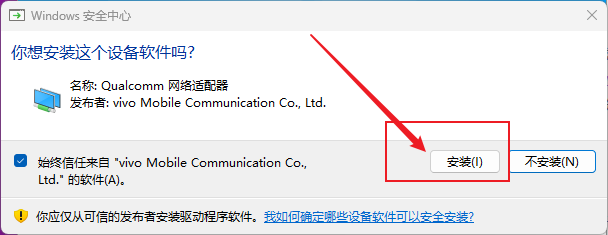 安装完毕!  点击完成后,助手应该是会自动重启的(如果没有就关闭重新打开安装好的程序),然后会有各种弹窗,会自动关闭的哈,作者制作不易,一点弹窗,也是可以理解的~~ 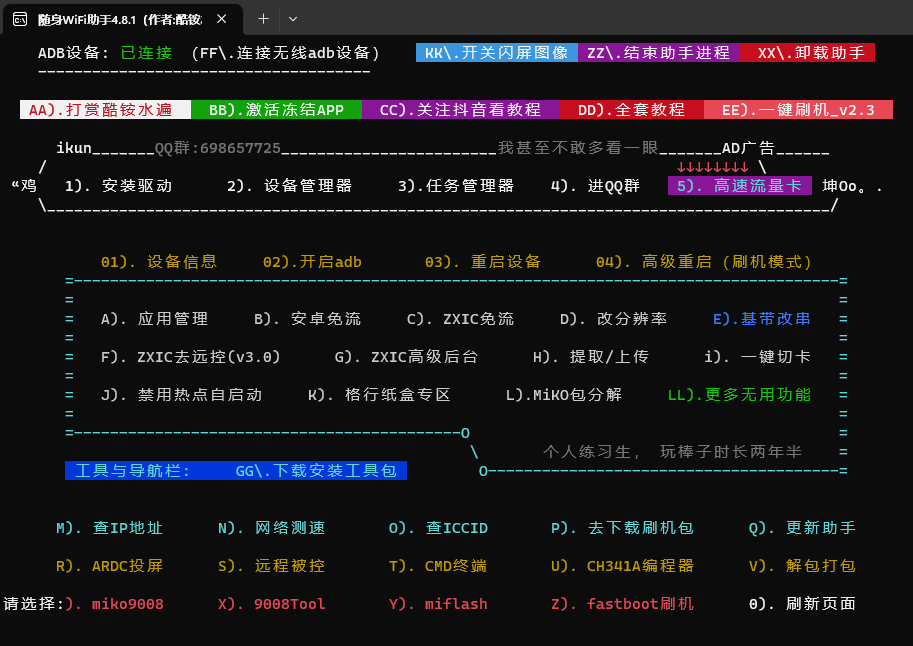 如上图,检查一下左上角是否有 **ADB设备:已连接** 如果没有,就去设备管理器检查一下串口里有没有一个名为 **ADB Interface** 如下图:  没有的话就是驱动没装上,重复上面,一定要保证ADB连接上 #### 安装9008Tool 打开随身wifi助手后,我们依照功能选项,输入**W** 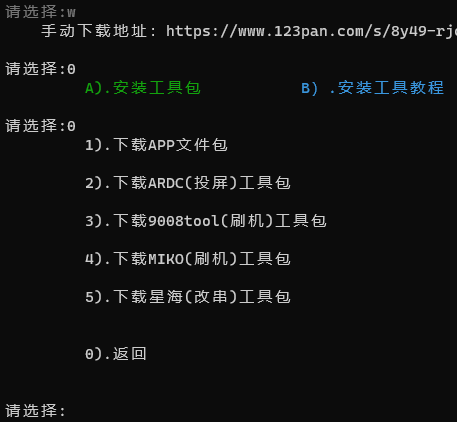 选择**3**,下载安装好**9008Tool**,然后回到助手,或者重新打开助手(随身wifi助手),接着输入**X**,进入9008Tool  上面图片这样,我们选择**2**,这时候会弹出一个文本和一个唐川,按照文本操作就行:  **操作如下:**  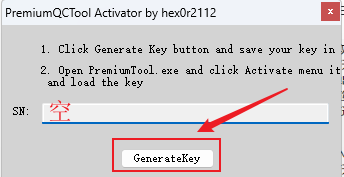 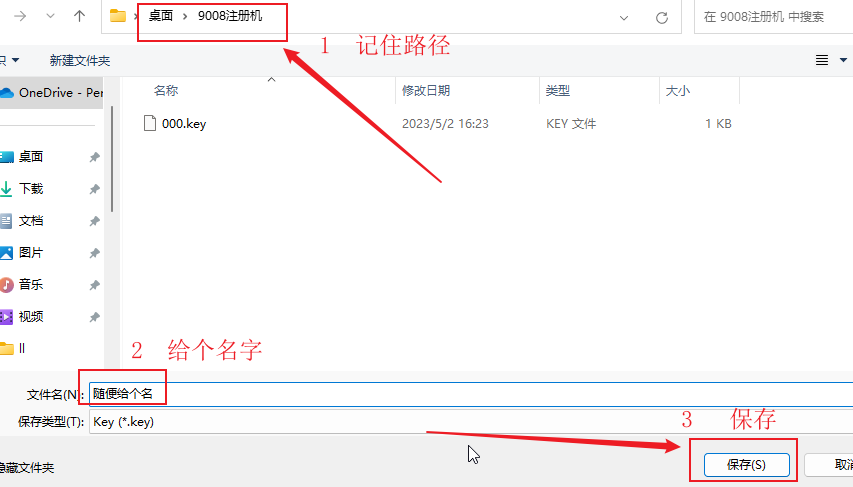 保存完后,可以将没有自动关闭的弹窗都关闭掉 回到助手的9008Tool里  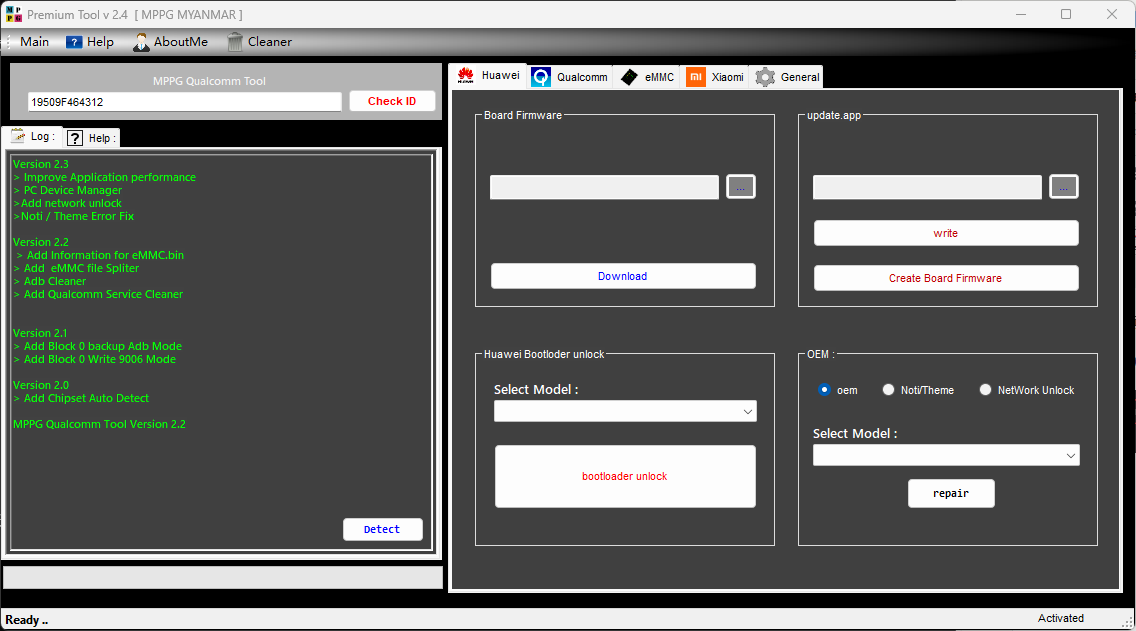 点击左上角Help 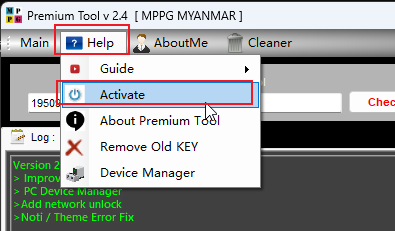 将刚刚保存的那个文件选上,会有弹窗,就可以了 #### 备份 可以直接把主拆下来,也可以直接找个牙签,按住随身WiFi的重置按键,下面贴张图 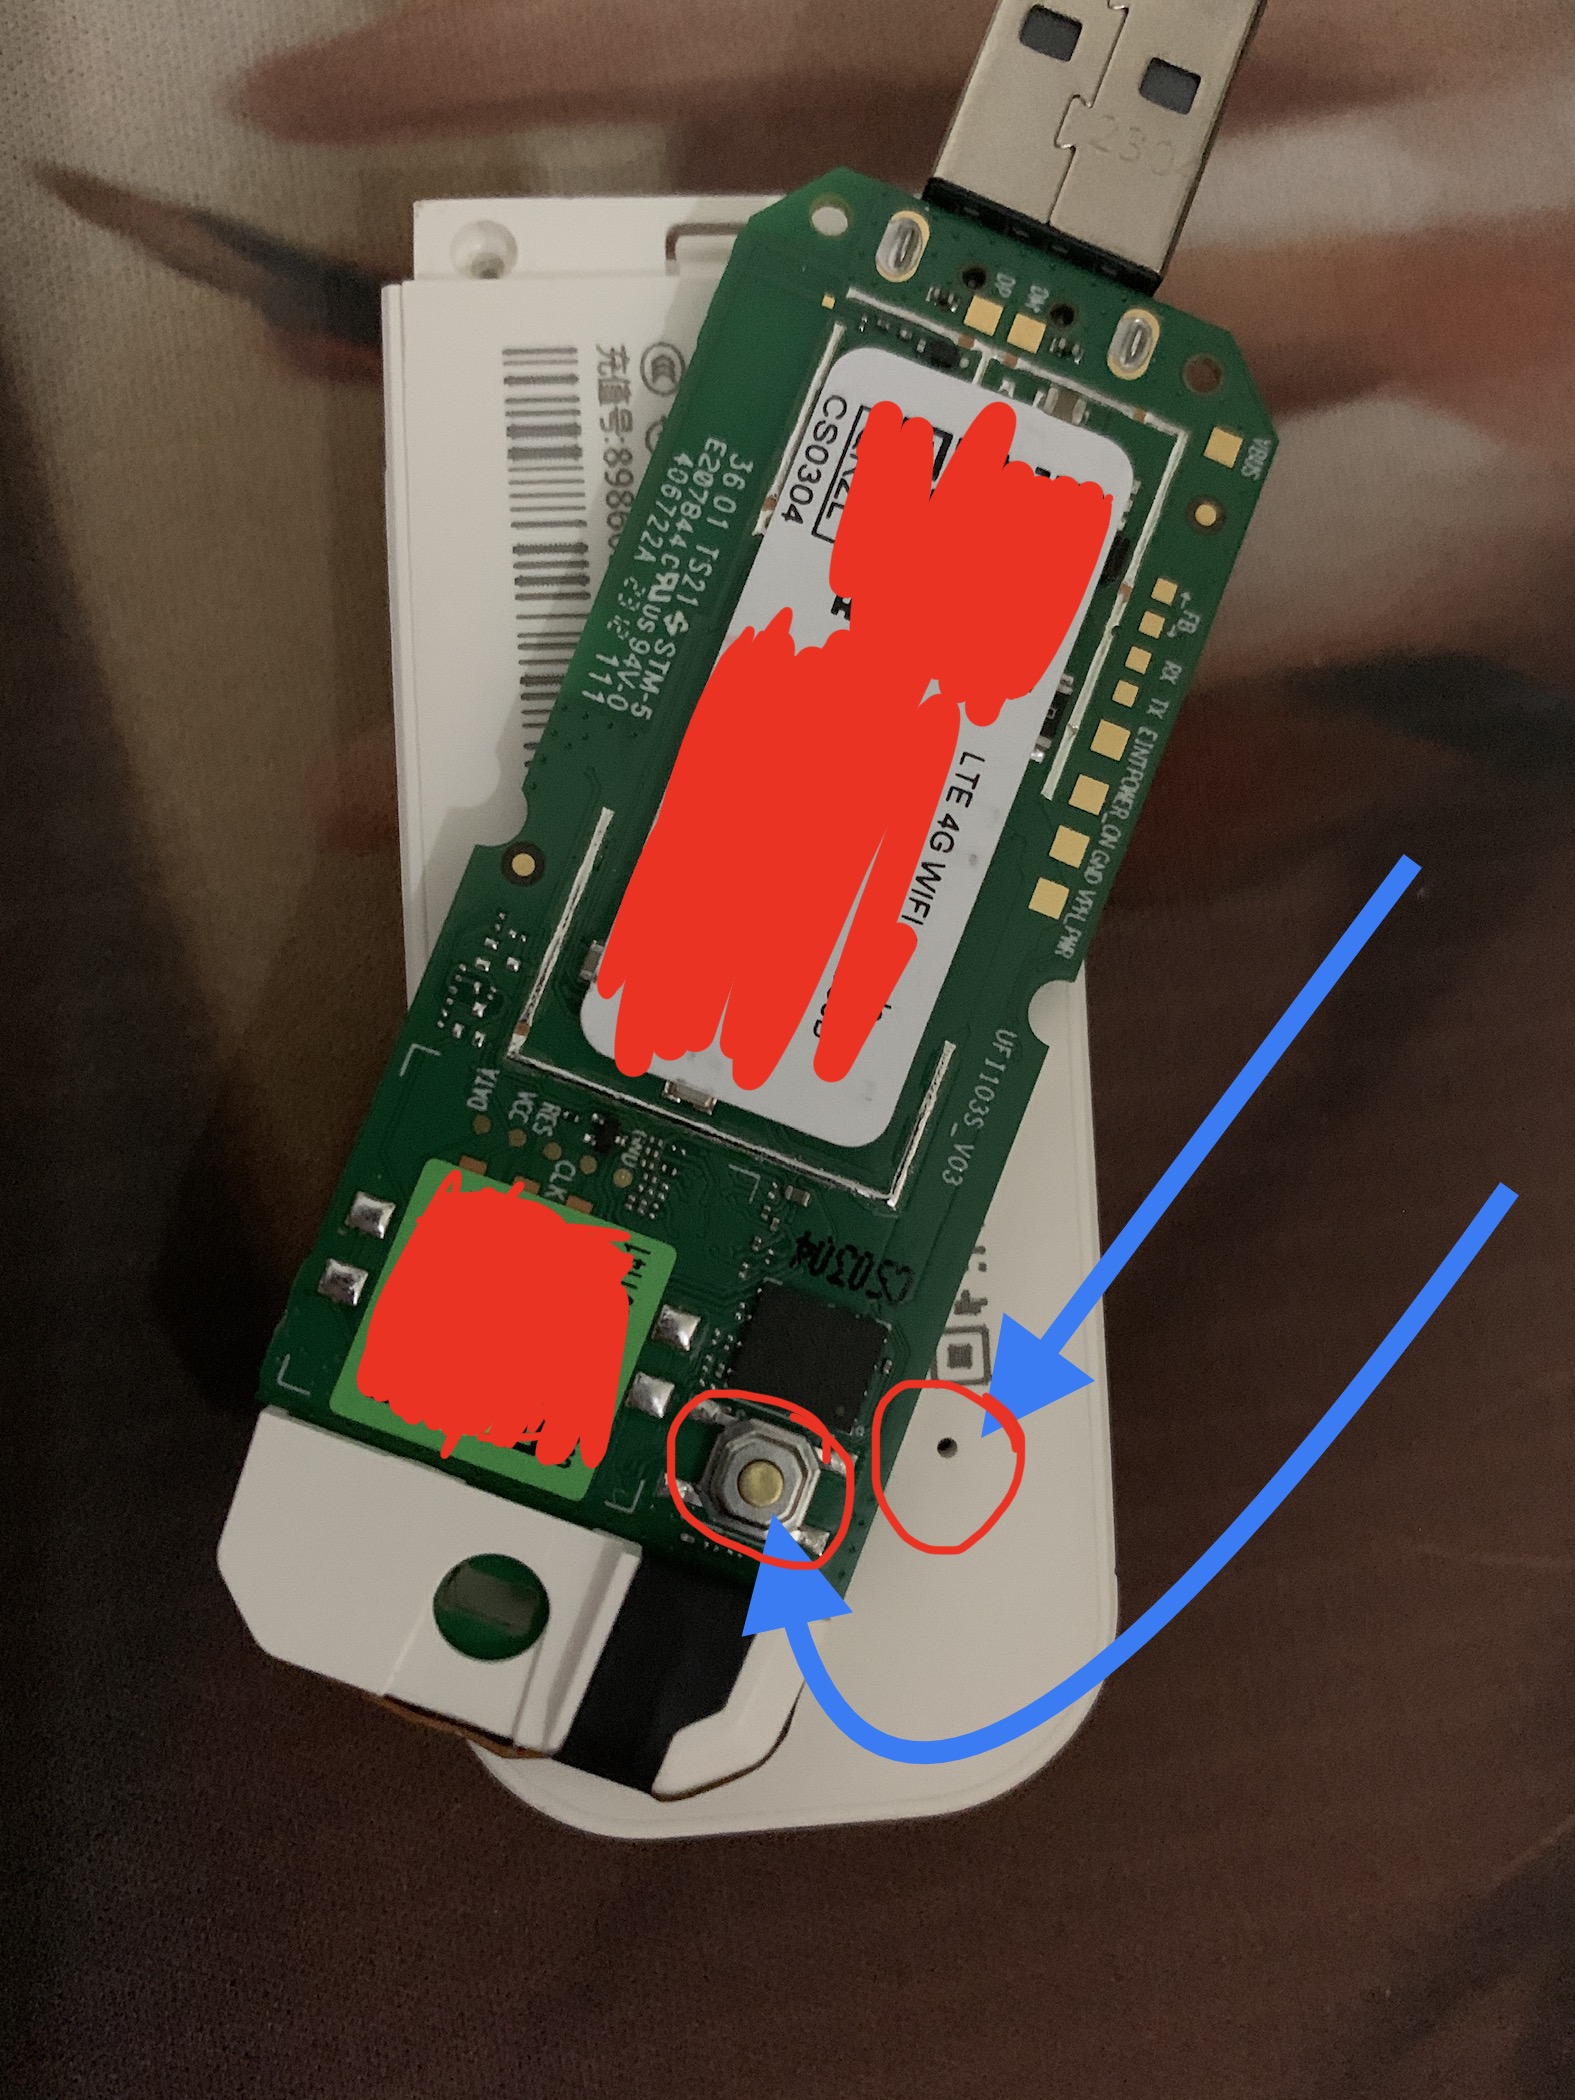 按住不放,插入电脑的usb口进去,等电脑识别到设备的声音,放开,这时候棒子(随身wifi)的灯应该都是不会亮的,到控制面板打开设备管理器,找到端口,看看有没有识别到一个xxxUSBxxx9008的COM口:  有识别到就ok,,打开9008Tool工具,按照下面图片依次点击 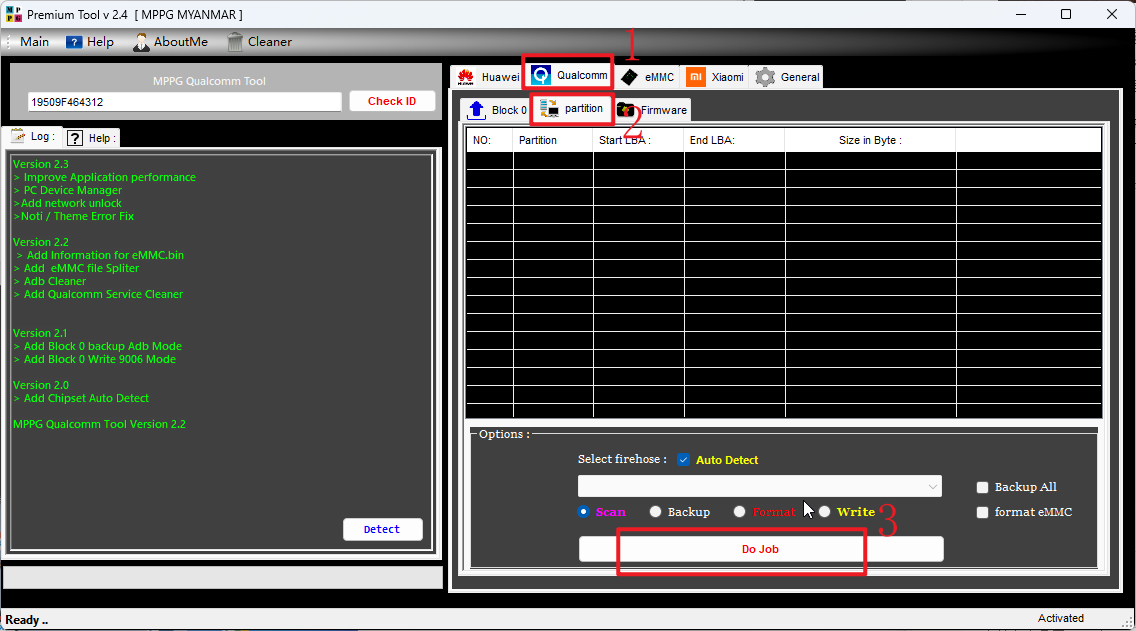 等待工具识别,左边日志Log识别到COM3端口,cpu是MSM8916(晓龙410) 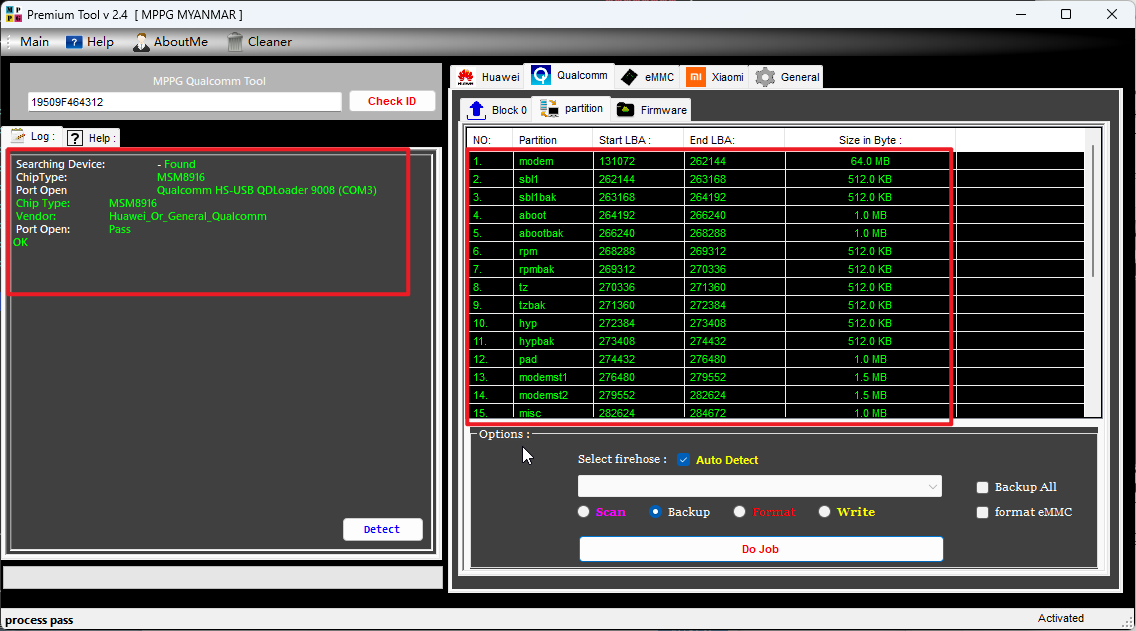 接着,按下图,选好路劲备份,以免变砖 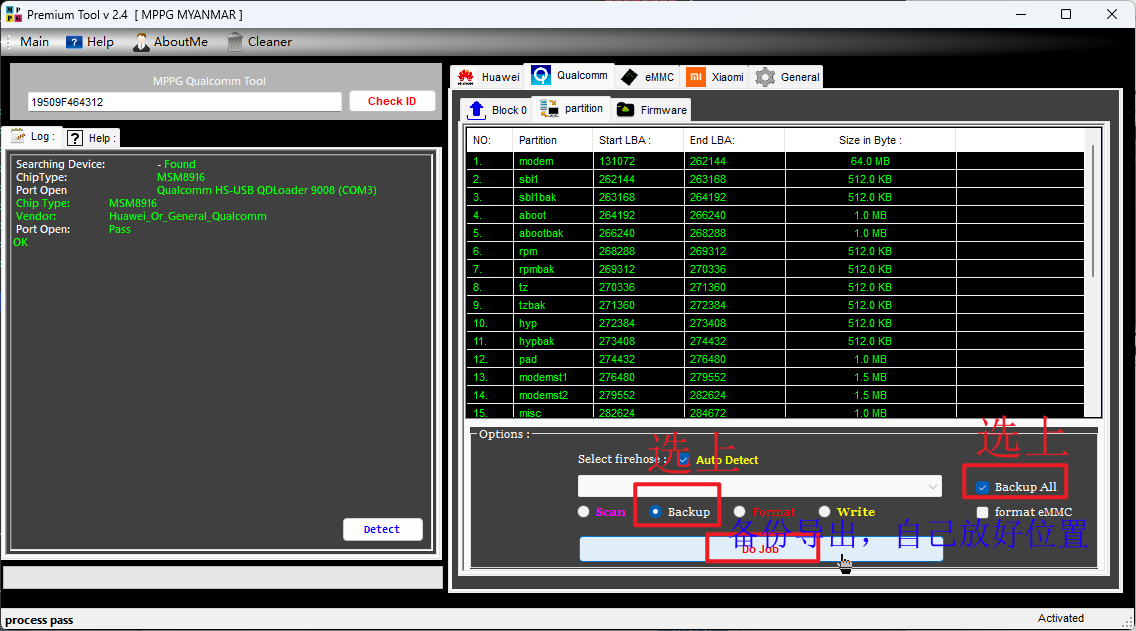 等待备份完成(有点时间,耐心等待一下,不要乱点),左侧的日志会输出 后面检查一下备份目录里有没有与右侧一样同大小同数量 的各个文件,有了就行 #### 刷机 在上方提供的文件夹中下载**ADBtools.zip**下载解压到一个文件夹内,使用cmd进入到这个文件夹里面输入 ```cmd adb devices ``` 不行的话就adb换adb.exe,或者前面再加个.\来表示绝对路径  现在棒子还处于9008模式,我们重新拔插一下再输入  看到已经识别到了 接着输入 ```cmd adb reboot bootloader ```  棒子开始重启进入bootloader 我这里用的debian底包: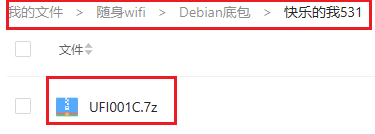 把压缩包下载解压出来,双击flash.bat运行 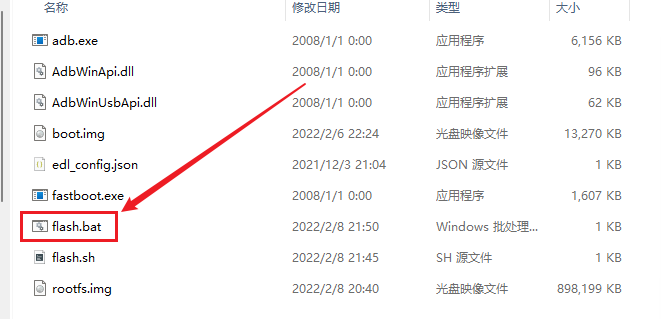 按提示,回车继续就行  完成后将棒子拔掉,重新插入 刷机完成 #### 网络配置和ssh连接 ##### WIN10及以上(WIN8应该也行) 提醒设备连接声,看一下右下角有没有设备连接图标,我这里没有,就直接到设备管理器看  右下角有设备提醒的应该是直接显示到**网络适配器**里面了,我这里需要修改驱动,有在网络适配器显示**NDIS的Intemet共享设备**字眼的可以跳过这个驱动设置的步骤 > **一个坑:** > > 如果识别到其他位置的上的设备(非“其他设备”里面),可以直接==》右击==》卸载设备 然后重新拔插一下棒子 右击新识别到的设备 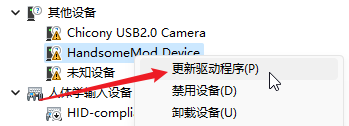 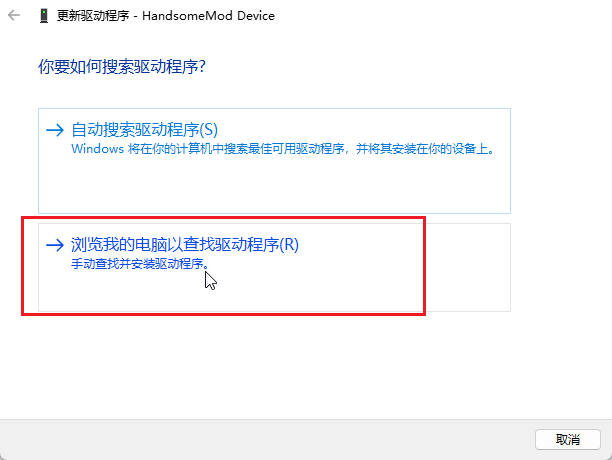 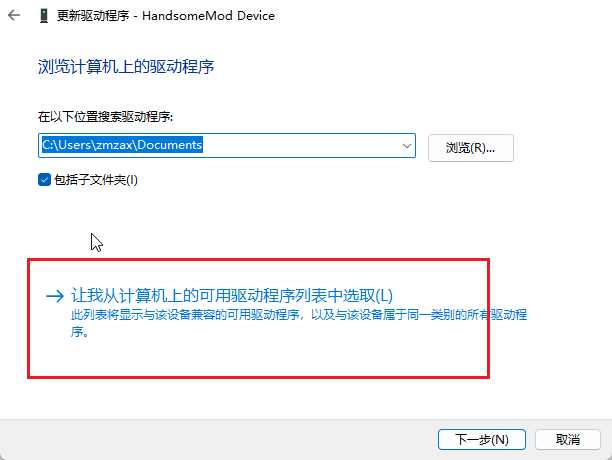 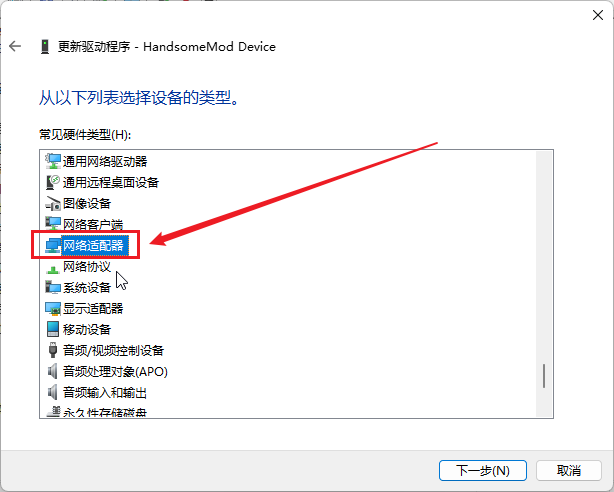 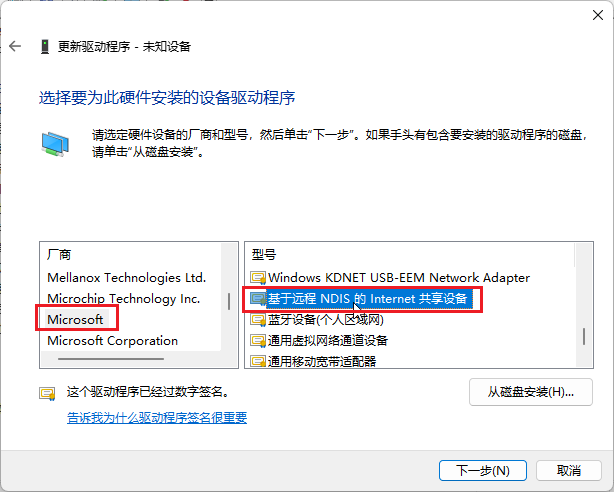 弹出的警告窗口我们选择**是** 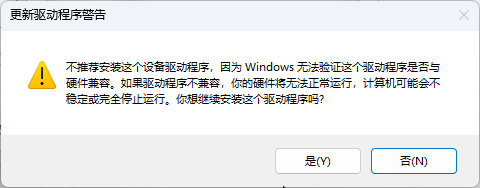 等待安装 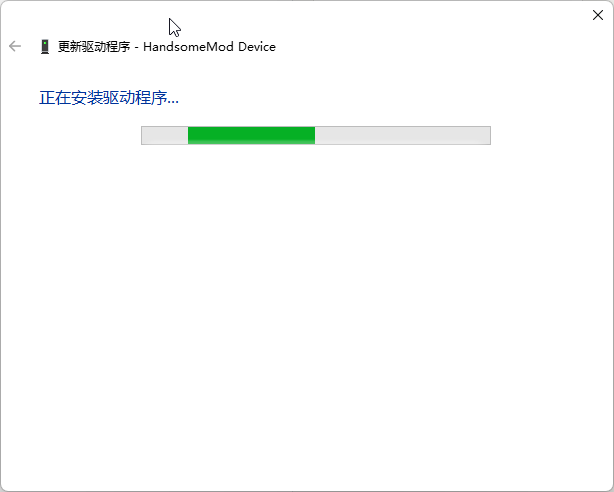 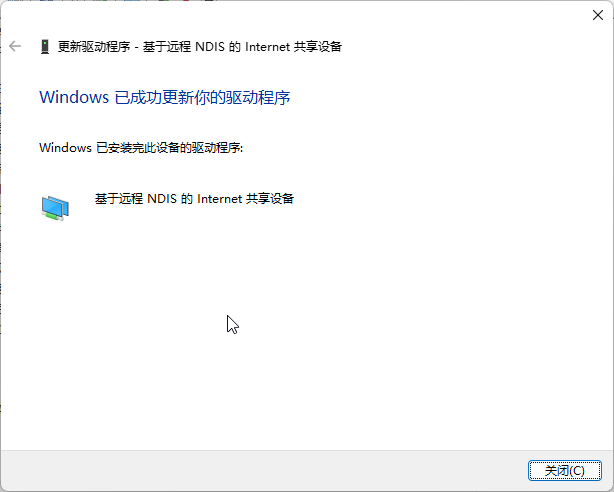 安装完成后,在网络适配器里多了一个出来,如果没有,就把棒子拔插一下 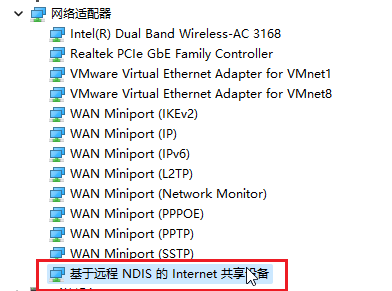 然后移步到网络连接,能看到多了一个有线网络  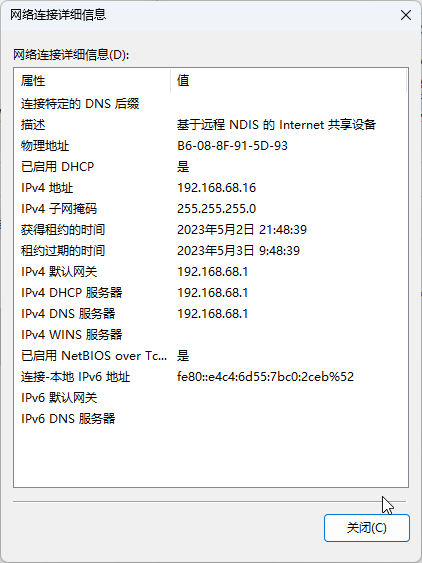 ##### WIN7(7以下的没用) 在设备管理器找到新加上的设备,我这里多出两个,adb就不用该,右击另一个,更新驱动  与win10步骤一样 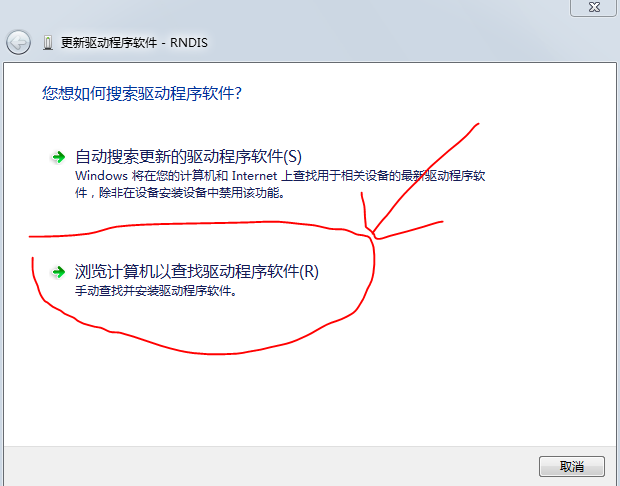 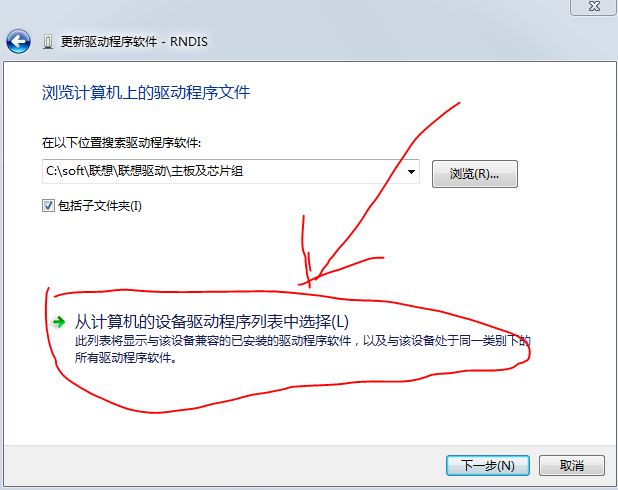 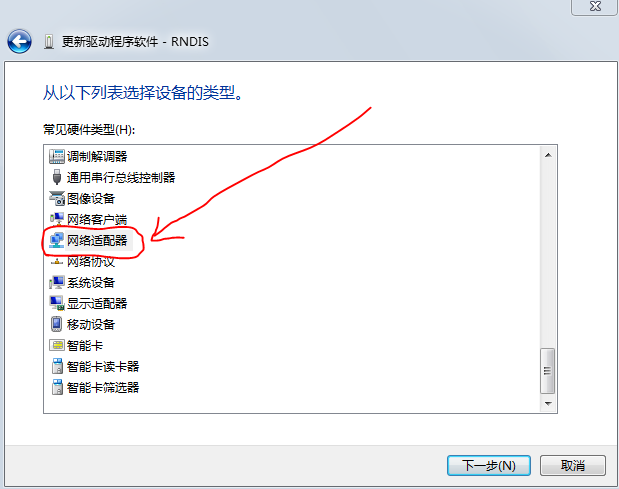 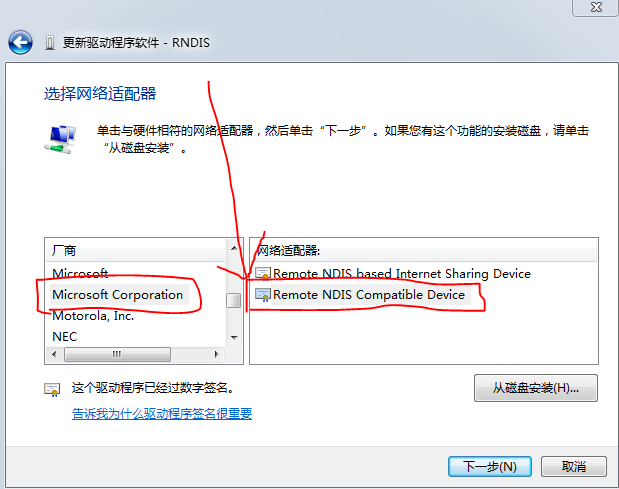 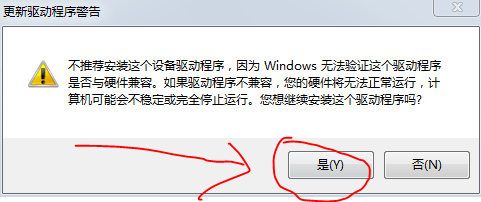 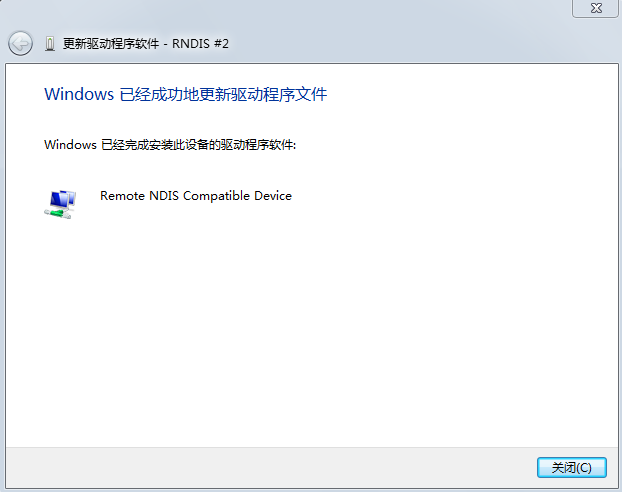 看一下设备管理器里的网络适配有没有加上 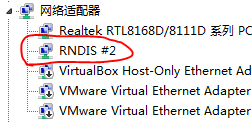 到连接里看看 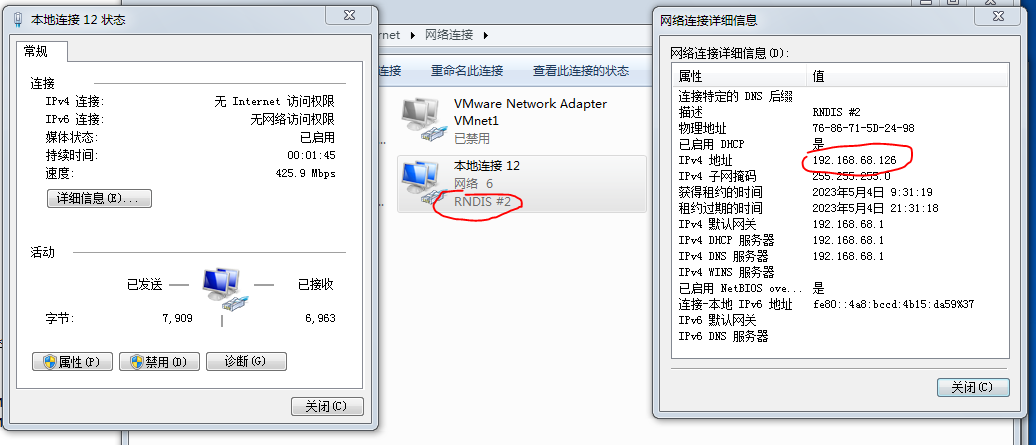 --- 刷入自带热点4G-wifi 密码:12345678 Host Name(IP地址):192.168.68.1 Port(端口):22 默认不变 用户名:root 密码:1 打开ssh shell工具(这里使用xshell)用上面信息连接上棒子 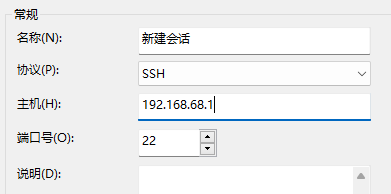 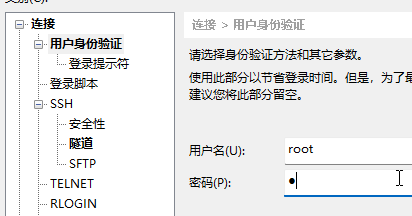 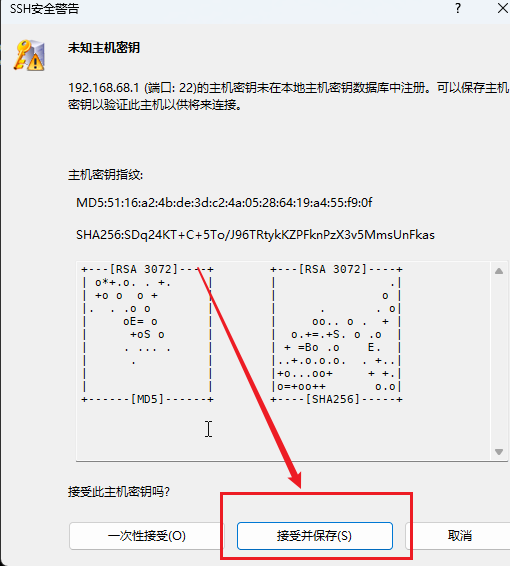 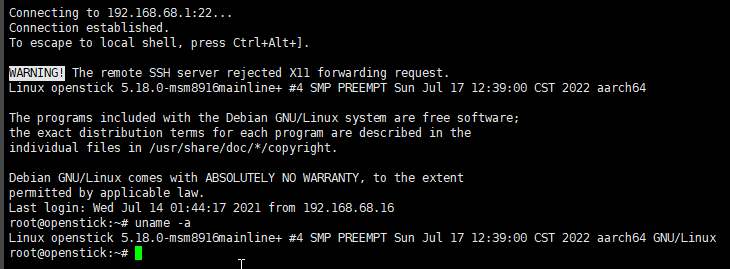 在终端内输入nmtui ```shell nmtui ``` 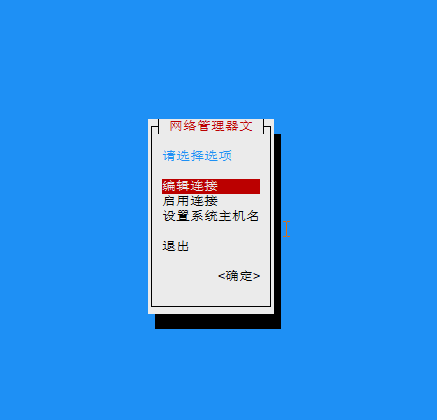 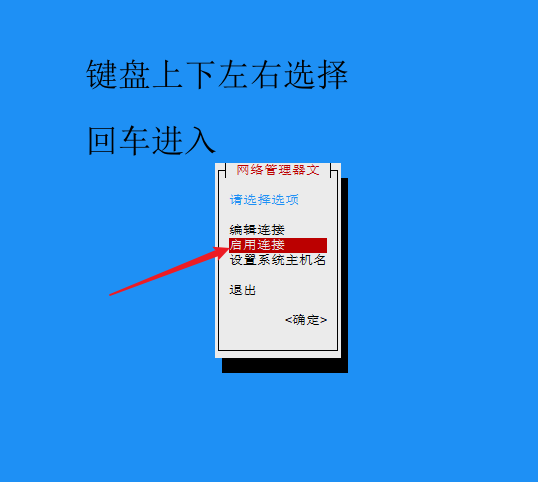 如果提示下面这样的话,我们就先去关掉一下自身的热点再来连接 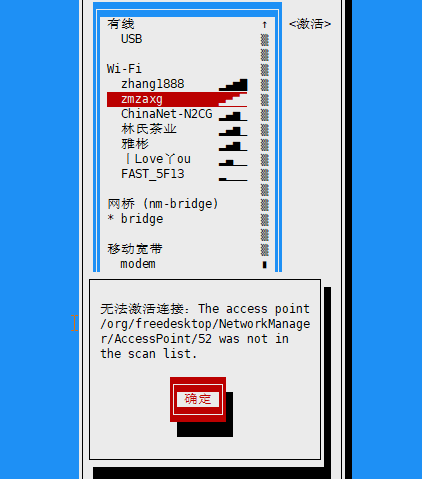 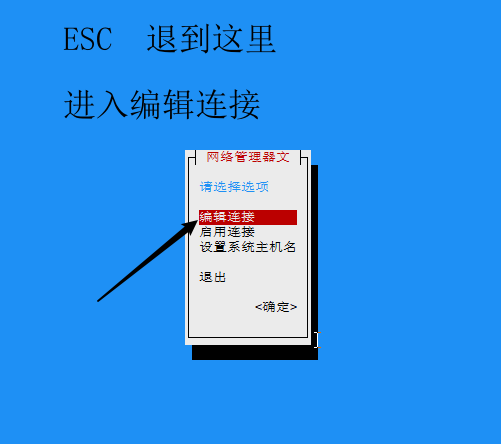 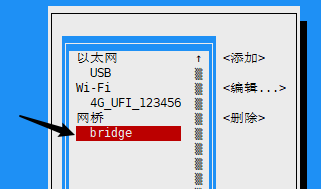 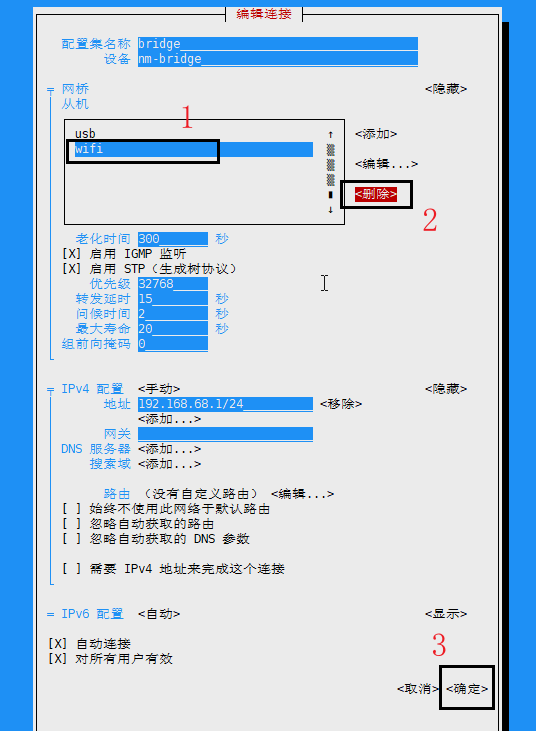 删除掉网桥内的wifi后再回到工具首页,进入**启用连接** 选择自己家里wifi 输入密码确定连接 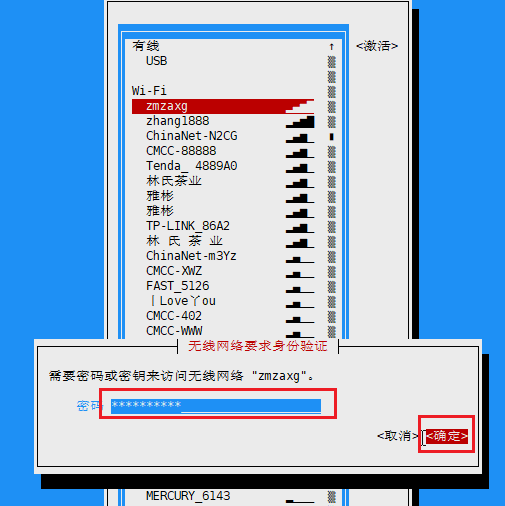 已连接的wifi 会在wifi名前带个“*” 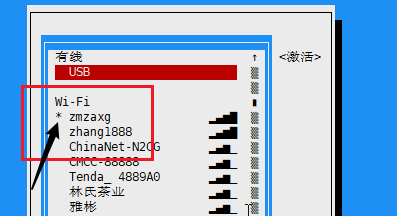 退出工具,ping一下百度可以ping通 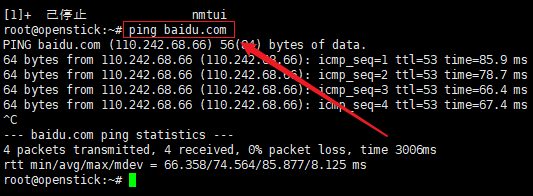 到此刷机全程已完毕!! 恭喜,获得一台口袋linuux服务器 ### 拓展 #### 设置添加swapfile虚拟内存 由于只有512m内存,4g存储 512m内存在运行一些东西容易会爆满,就给设一下swapfile虚拟内存 使用下面两行shell看一下 ```shell ##查看当前内存信息 free -m ##查看swap信息 swapon -s ```  可以看到交换内存有190m --- 判断系是否为btrfs文件系统 ```shell btrfs filesystem show ```  新建swapfile文件 ```shell touch /swapfile ``` 配置swapfile文件属性为“C” ```shhell chattr +C /swapfile ``` 配置btrfs禁止压缩swapfile文件 ```shell sudo btrfs property set /swapfile compression none ``` 将swapfile文件扩展到512m(当然可以自行设置大小,但由于空间只有4g不到,适当即可) ```shell sudo fallocate -l 512M /swapfile ``` 查看wsapfile文件有没有创建好 ```shell du -sh /swapfile ```  给swapfile添加权限 ```shell sudo chmod 600 /swapfile ``` 激活swapfile ```shell sudo mkswap /swapfile sudo swapon /swapfile ```  查看是否成功激活swapfiile ```shell sudo swapon -s ```  把 swapfile加入开机默认激活 ```shell vi /etc/fstab ##i进入编辑,下面内容复制进去保存退出 # 设置swap内存交换空间优先值为1 swapfile swap swap defaults,pri=1 0 0 ``` 重启一下棒子  可以看到交换内存有了702,swap多了一行 #### 更换默认源 安装 ```shell apt install apt-transport-https ca-certificates ```  修改软件源 ```shell sudo vi /etc/apt/sources.list ``` 修改或添加以下内容 ```shell # 默认注释了源码镜像以提高 apt update 速度,如有需要可自行取消注释 deb https://mirrors.tuna.tsinghua.edu.cn/debian/ bullseye main contrib non-free # deb-src https://mirrors.tuna.tsinghua.edu.cn/debian/ bullseye main contrib non-free deb https://mirrors.tuna.tsinghua.edu.cn/debian/ bullseye-updates main contrib non-free # deb-src https://mirrors.tuna.tsinghua.edu.cn/debian/ bullseye-updates main contrib non-free deb https://mirrors.tuna.tsinghua.edu.cn/debian/ bullseye-backports main contrib non-free # deb-src https://mirrors.tuna.tsinghua.edu.cn/debian/ bullseye-backports main contrib non-free deb https://mirrors.tuna.tsinghua.edu.cn/debian-security bullseye-security main contrib non-free # deb-src https://mirrors.tuna.tsinghua.edu.cn/debian-security bullseye-security main contrib non-free ``` 解决AdoptOpenJDK报错 ```shell sudo sed -i '1c deb http://mirrors.tuna.tsinghua.edu.cn/Adoptium/deb buster main' /etc/apt/sources.list.d/AdoptOpenJDK.list gpg --keyserver hkp://keyserver.ubuntu.com:80 --recv-keys 843C48A565F8F04B sudo gpg --armor --export 843C48A565F8F04B | sudo apt-key add - ```  禁用Mobian源 ```shell sudo sed -i '1c #deb http://repo.mobian-project.org/ bullseye main non-free' /etc/apt/sources.list.d/mobian.list ``` 更新源指令 ```shell sudo apt-get update  将系统软件都更新到最新版本 ```shell sudo apt-get upgrade ``` 可能会有下面这样的提醒,选择2保持当前版本就行  ### python环境修复 安装好之后python3如果不能用则需要重装,查看版本 ```shell python3 --version ``` 如果出现版本号则正常,否则像下面图片或者其他问题,就按下面方法重装。  卸载 ```shell sudo apt-get --purge remove python3 ``` 卸载其他无用的依赖 ```shell sudo apt-get autoremove ``` 重新安装python ```shell sudo apt install python3 python3-pip python-is-python2 ``` 待安装完成即可,可以输入python然后按几下Tab看看 再--version看看版本能不能正常输出。  Loading... 该文章适用与商场上大部分主流的随身wifi(棒子)设备,如UFI001,UFI003,UFI103S(目前我手上只整过这几种)等 ### 准备 准备一下我们的各种工具(文章使用的工具下方均提供下载) 1. ssh连接工具(这里用xshell) 2. 安装好备份工具(这里用9008Tool工具) 3. 随身wifi助手(水遍工具箱)来自酷安作者:酷安水遍[更新助手官方版下载丨最新版下载丨绿色版下载丨APP下载-123云盘 (123pan.com)](https://www.123pan.com/s/8y49-oBZ0h)安装时候选择**驱动程序全部安装** 4. Debian系统底包: 可以选择以下大佬的低包使用: 1. [来自 快乐的我531 - 酷安 (coolapk.com)](https://www.coolapk.com/feed/37616461?shareKey=YTNkNDNkZjk0NGIwNjJmMjY0ZjY~) 2. 超频底包:[410随身wifi 各个频率版&释放内存版&驱动全面 来自 jsbsbxjxh66 - 酷安 (coolapk.com)](https://www.coolapk.com/feed/41664623?shareKey=M2E4YmM5MmE4N2Q1NjQzNjhiZjk~&shareFrom=com.coolapk.market_13.1.1) <button class=" btn m-b-xs btn-info " onclick="">转存的文件</button><div class="tab-container post_tab box-shadow-wrap-lg"> <ul class="nav no-padder b-b scroll-hide" role="tablist"> <li class='nav-item active' role="presentation"><a class='nav-link active' style="" data-toggle="tab" aria-controls='tabs-2d60ee5e99a4bfa9ad709b05891ed3d5330' role="tab" data-target='#tabs-2d60ee5e99a4bfa9ad709b05891ed3d5330'>123盘</a></li><li class='nav-item ' role="presentation"><a class='nav-link ' style="" data-toggle="tab" aria-controls='tabs-9a37f1e79aaf223343d66478c0cbca65941' role="tab" data-target='#tabs-9a37f1e79aaf223343d66478c0cbca65941'>阿里云</a></li><li class='nav-item ' role="presentation"><a class='nav-link ' style="" data-toggle="tab" aria-controls='tabs-6062cc7f6a9816f8d0f733dfb3052e9c312' role="tab" data-target='#tabs-6062cc7f6a9816f8d0f733dfb3052e9c312'>本地</a></li> </ul> <div class="tab-content no-border"> <div role="tabpanel" id='tabs-2d60ee5e99a4bfa9ad709b05891ed3d5330' class="tab-pane fade active in"> https://www.123pan.com/s/o14eVv-6y5Sh.html提取码:nnya</div><div role="tabpanel" id='tabs-9a37f1e79aaf223343d66478c0cbca65941' class="tab-pane fade "> 无</div><div role="tabpanel" id='tabs-6062cc7f6a9816f8d0f733dfb3052e9c312' class="tab-pane fade "> 无</div> </div> </div> ### 开始 #### 随身WiFi助手安装驱动 将上面的随身wifi助手安装到电脑上,然后把wifi棒子插到电脑上,打开助手给你先鸡太美一段,不是毒瘤哦!!!  回车后会有驱动弹窗,点两下装就可以了  安装  安装完毕!  点击完成后,助手应该是会自动重启的(如果没有就关闭重新打开安装好的程序),然后会有各种弹窗,会自动关闭的哈,作者制作不易,一点弹窗,也是可以理解的~~  如上图,检查一下左上角是否有 **ADB设备:已连接** 如果没有,就去设备管理器检查一下串口里有没有一个名为 **ADB Interface** 如下图:  没有的话就是驱动没装上,重复上面,一定要保证ADB连接上 #### 安装9008Tool 打开随身wifi助手后,我们依照功能选项,输入**W**  选择**3**,下载安装好**9008Tool**,然后回到助手,或者重新打开助手(随身wifi助手),接着输入**X**,进入9008Tool  上面图片这样,我们选择**2**,这时候会弹出一个文本和一个唐川,按照文本操作就行:  **操作如下:**    保存完后,可以将没有自动关闭的弹窗都关闭掉 回到助手的9008Tool里   点击左上角Help  将刚刚保存的那个文件选上,会有弹窗,就可以了 #### 备份 可以直接把主拆下来,也可以直接找个牙签,按住随身WiFi的重置按键,下面贴张图  按住不放,插入电脑的usb口进去,等电脑识别到设备的声音,放开,这时候棒子(随身wifi)的灯应该都是不会亮的,到控制面板打开设备管理器,找到端口,看看有没有识别到一个xxxUSBxxx9008的COM口:  有识别到就ok,,打开9008Tool工具,按照下面图片依次点击  等待工具识别,左边日志Log识别到COM3端口,cpu是MSM8916(晓龙410)  接着,按下图,选好路劲备份,以免变砖  等待备份完成(有点时间,耐心等待一下,不要乱点),左侧的日志会输出 后面检查一下备份目录里有没有与右侧一样同大小同数量 的各个文件,有了就行 #### 刷机 在上方提供的文件夹中下载**ADBtools.zip**下载解压到一个文件夹内,使用cmd进入到这个文件夹里面输入 ```cmd adb devices ``` 不行的话就adb换adb.exe,或者前面再加个.\来表示绝对路径  现在棒子还处于9008模式,我们重新拔插一下再输入  看到已经识别到了 接着输入 ```cmd adb reboot bootloader ```  棒子开始重启进入bootloader 我这里用的debian底包: 把压缩包下载解压出来,双击flash.bat运行  按提示,回车继续就行  完成后将棒子拔掉,重新插入 刷机完成 #### 网络配置和ssh连接 ##### WIN10及以上(WIN8应该也行) 提醒设备连接声,看一下右下角有没有设备连接图标,我这里没有,就直接到设备管理器看  右下角有设备提醒的应该是直接显示到**网络适配器**里面了,我这里需要修改驱动,有在网络适配器显示**NDIS的Intemet共享设备**字眼的可以跳过这个驱动设置的步骤 > **一个坑:** > > 如果识别到其他位置的上的设备(非“其他设备”里面),可以直接==》右击==》卸载设备 然后重新拔插一下棒子 右击新识别到的设备      弹出的警告窗口我们选择**是**  等待安装   安装完成后,在网络适配器里多了一个出来,如果没有,就把棒子拔插一下  然后移步到网络连接,能看到多了一个有线网络   ##### WIN7(7以下的没用) 在设备管理器找到新加上的设备,我这里多出两个,adb就不用该,右击另一个,更新驱动  与win10步骤一样       看一下设备管理器里的网络适配有没有加上  到连接里看看  --- 刷入自带热点4G-wifi 密码:12345678 Host Name(IP地址):192.168.68.1 Port(端口):22 默认不变 用户名:root 密码:1 打开ssh shell工具(这里使用xshell)用上面信息连接上棒子     在终端内输入nmtui ```shell nmtui ```   如果提示下面这样的话,我们就先去关掉一下自身的热点再来连接     删除掉网桥内的wifi后再回到工具首页,进入**启用连接** 选择自己家里wifi 输入密码确定连接  已连接的wifi 会在wifi名前带个“*”  退出工具,ping一下百度可以ping通  到此刷机全程已完毕!! 恭喜,获得一台口袋linuux服务器 ### 拓展 #### 设置添加swapfile虚拟内存 由于只有512m内存,4g存储 512m内存在运行一些东西容易会爆满,就给设一下swapfile虚拟内存 使用下面两行shell看一下 ```shell ##查看当前内存信息 free -m ##查看swap信息 swapon -s ```  可以看到交换内存有190m --- 判断系是否为btrfs文件系统 ```shell btrfs filesystem show ```  新建swapfile文件 ```shell touch /swapfile ``` 配置swapfile文件属性为“C” ```shhell chattr +C /swapfile ``` 配置btrfs禁止压缩swapfile文件 ```shell sudo btrfs property set /swapfile compression none ``` 将swapfile文件扩展到512m(当然可以自行设置大小,但由于空间只有4g不到,适当即可) ```shell sudo fallocate -l 512M /swapfile ``` 查看wsapfile文件有没有创建好 ```shell du -sh /swapfile ```  给swapfile添加权限 ```shell sudo chmod 600 /swapfile ``` 激活swapfile ```shell sudo mkswap /swapfile sudo swapon /swapfile ```  查看是否成功激活swapfiile ```shell sudo swapon -s ```  把 swapfile加入开机默认激活 ```shell vi /etc/fstab ##i进入编辑,下面内容复制进去保存退出 # 设置swap内存交换空间优先值为1 swapfile swap swap defaults,pri=1 0 0 ``` 重启一下棒子  可以看到交换内存有了702,swap多了一行 #### 更换默认源 安装 ```shell apt install apt-transport-https ca-certificates ```  修改软件源 ```shell sudo vi /etc/apt/sources.list ``` 修改或添加以下内容 ```shell # 默认注释了源码镜像以提高 apt update 速度,如有需要可自行取消注释 deb https://mirrors.tuna.tsinghua.edu.cn/debian/ bullseye main contrib non-free # deb-src https://mirrors.tuna.tsinghua.edu.cn/debian/ bullseye main contrib non-free deb https://mirrors.tuna.tsinghua.edu.cn/debian/ bullseye-updates main contrib non-free # deb-src https://mirrors.tuna.tsinghua.edu.cn/debian/ bullseye-updates main contrib non-free deb https://mirrors.tuna.tsinghua.edu.cn/debian/ bullseye-backports main contrib non-free # deb-src https://mirrors.tuna.tsinghua.edu.cn/debian/ bullseye-backports main contrib non-free deb https://mirrors.tuna.tsinghua.edu.cn/debian-security bullseye-security main contrib non-free # deb-src https://mirrors.tuna.tsinghua.edu.cn/debian-security bullseye-security main contrib non-free ``` 解决AdoptOpenJDK报错 ```shell sudo sed -i '1c deb http://mirrors.tuna.tsinghua.edu.cn/Adoptium/deb buster main' /etc/apt/sources.list.d/AdoptOpenJDK.list gpg --keyserver hkp://keyserver.ubuntu.com:80 --recv-keys 843C48A565F8F04B sudo gpg --armor --export 843C48A565F8F04B | sudo apt-key add - ```  禁用Mobian源 ```shell sudo sed -i '1c #deb http://repo.mobian-project.org/ bullseye main non-free' /etc/apt/sources.list.d/mobian.list ``` 更新源指令 ```shell sudo apt-get update  将系统软件都更新到最新版本 ```shell sudo apt-get upgrade ``` 可能会有下面这样的提醒,选择2保持当前版本就行  ### python环境修复 安装好之后python3如果不能用则需要重装,查看版本 ```shell python3 --version ``` 如果出现版本号则正常,否则像下面图片或者其他问题,就按下面方法重装。  卸载 ```shell sudo apt-get --purge remove python3 ``` 卸载其他无用的依赖 ```shell sudo apt-get autoremove ``` 重新安装python ```shell sudo apt install python3 python3-pip python-is-python2 ``` 待安装完成即可,可以输入python然后按几下Tab看看 再--version看看版本能不能正常输出。  最后修改:2024 年 08 月 30 日 © 允许规范转载 打赏 赞赏作者 支付宝微信 赞 3 觉得文章有用,可以赞赏请我喝瓶冰露
1 条评论